ArchiMate 3.2
Ik heb een cursus gehad over archimate en moet binnenkort een examen inplannen. We hebben nog een aantal examen voorbeeldvragen open staan en deze moest je nadat je de stof had geleerd nog een keertje maken: gewoon om te zien of je alle basis hebt, of misschien nog op een bepaald onderdeel moet focussen.
Het begint natuurlijk met wat is het en waarom doen we dit. Het is een grafische weergave voor verschillende doeleinden. Om ervoor te zorgen dat de verschillende perspectieven
Ik begin met de passieve structuren, oftewel “passive structures”. Deze passieve structuren worden door de actieve structuren gemanipuleerd, oftewel aangepast (denk CRUD acties).
De tekeningen zijn volgens mij ook altijd hoekig aan de bovenkant…
We beginnen met de business layer en passive structures/elements:
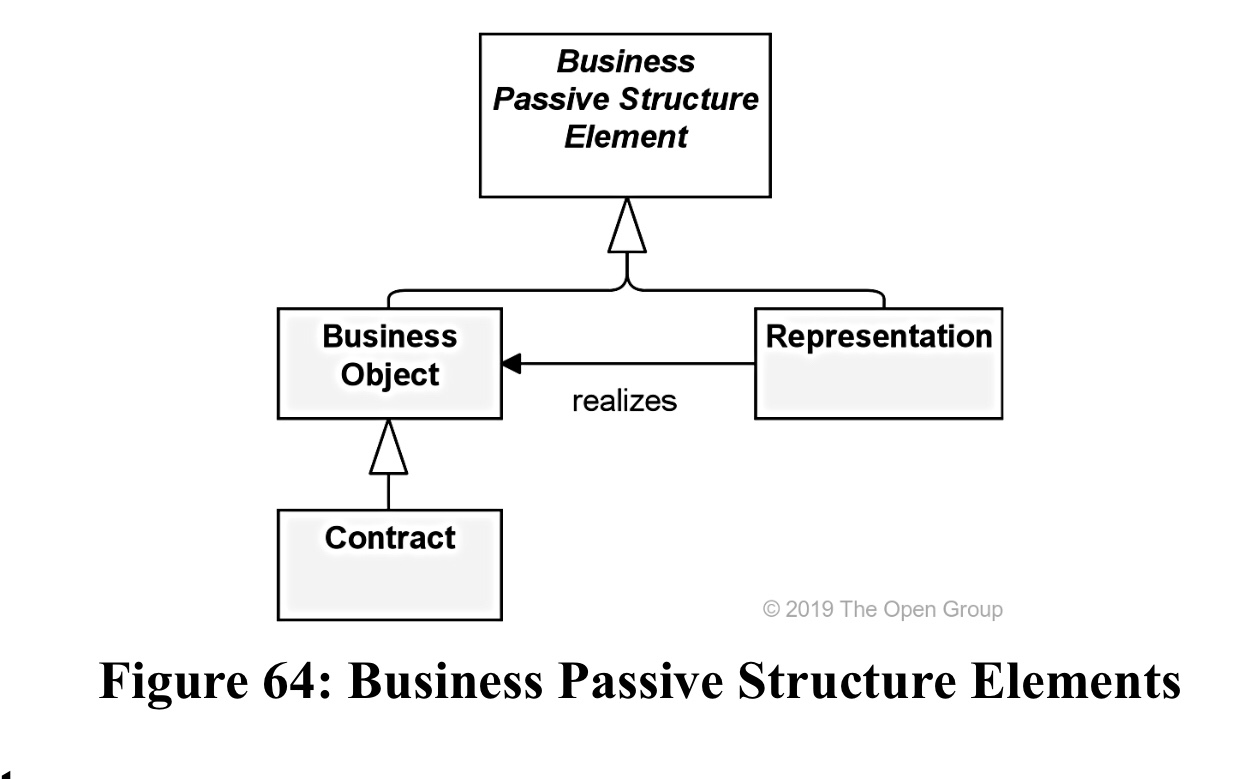
Hierin zie je eigenlijk maar 2 onderdelen:
Business Object en Representation. De belangrijkste bedrijfs concepten staan in deze objecten. Contract is een specialisatie van een BO.
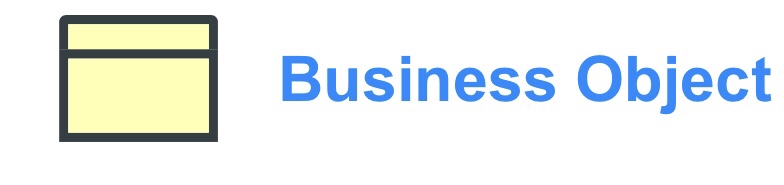
Een Business Object geeft een concept weer, dat gebruikt wordt in een bepaald bedrijfsdomein. ArchiMate focust meer op types dan op instanties. Hiermee wil gezegd worden dat een BO meer een object type (zoals UML of Java Class) zal zijn, waarmee meerdere instanties gemaakt kunnen worden. Heel af en toe worden wel instanties bedoeld, maar dat gaat over singletons. Dus waar maar 1 instantie van mogelijk is. Ze zijn passief omdat ze niets triggeren. Dus niet iets starten, zoals een business proces. Een BO kan gebruikt worden om informatie te laten zien dat vanuit het business point of view van belang is. Een BO kan door een Data Object worden gerealiseerd.
Een BO kan accessed worden, door business proces, business function, business interaction, business events en/of business services.
Een BO kan ook een association, specialization, aggregation of een composition relatie hebben met andere BO’s. Een BO kan realized worden door een representation of een Data Object of beide.
CONTRACT
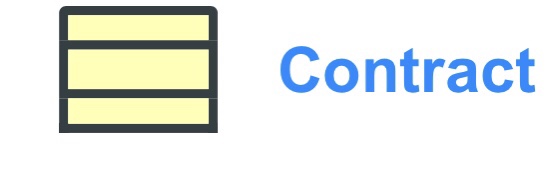
Een contract toont een formele of informele specificatie van een overeenkomst tussen een leverende- en consumerende partij dat de rechten en plichten specificeert omtrent een product en legt voor functionele en non-functionele parameters voor interactie.
Het element contract kan in de juridische zin, maar ook meer in de informele overeenkomst als zijnde geassocieerd met een product. Het kan ook een SLA zijn of bevatten, wat beschrijft wat de functionaliteit en kwaliteit van de services dat het product levert. Contract is een specialisatie (specialization) van een Business Object.
De relaties die bij een BO van toepassing zijn, zijn ook bij een contract mogelijk. Als extra kan een contract ook nog een aggregation relatie hebben met een product. Product komt uit de business layer als composite element.
Een voorbeeld kan zijn een bank contract of een telebankier contract of een service level agreement contract
REPRESENTATION
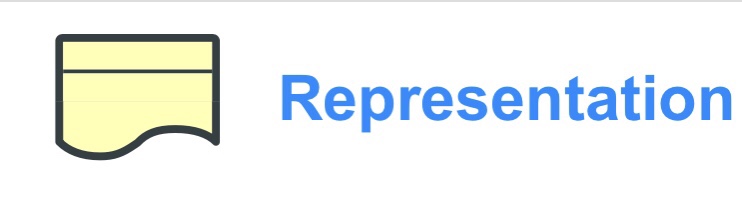
Een representation vertegenwoordigt een waarneembare vorm van de informatie dat door een BO wordt gedragen.
Representations (zoals berichten of documenten) zijn de waarneembare dragers van informatie die aan BO’s gerelateerd. Als het relevant is, kunnen representations in verschillende variaties voorkomen. Zoals bijvoorbeeld als medium (electronisch, papier, audio etc) of formaat (HTML, PDF, ASCI, RTC etc). 1 BO kan meerdere representations hebben. En een enkele representation kan ook 1 of meerdere specifieke BO’s realiseren (realize relatie).
Een “meaning” kan geassocieerd worden met een representation die deze meaning draagt. Meaning is een beschrijving dat duidelijk maakt wat het doel is van het element. Net zoals de eerder genoemde representation en business object is het een zelfstandig naamwoord wat betreft de naam van het object. Dus een relatie-bericht of een factuur pdf.
Business Layer en behavior elements
Getekend als ovalen in archimate.
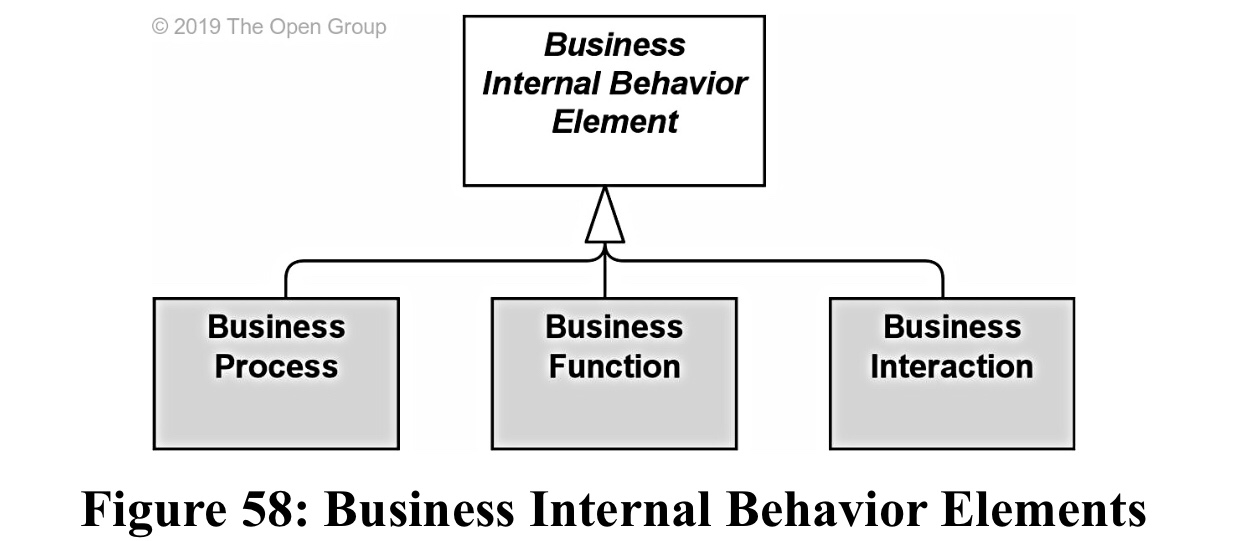
Je ziet 3 onderdelen: Business Proces, Business Function en Business Interaction
Blender 3D moves
As I am relearning how to start Blender 3D, this time I try to remember the key combinations that are shown in the tutorial.
Being in the process of building our first house, our architect told us that we could get started with writing down our must haves for a new home.
After that we would start sketching and so I started looking at some tutorials. One being a dutch one, explaining how to model a house.

For people that know how to model and create stuff in Blender 3D, it really is nothing. But for me: it was really nice to learn.
The goal for this blog is for myself to remember which key combinations I should use.
I follow a dutch Youtube channel, because I was looking for modelling a house. It starts with the basics:
The only two things I learned from this basic Blender informative session was:
- it was a dutch product
- through Edit –> Preferences –> System –> Undo steps is to small. Alter the 32 strokes to 256. For my own preferences I did 128. This because I suspect that the memory usage will be a lot bigger
Tutorial 2 starts with the default project
The square and camera is a viewpoint. The real object is shown by using menu Render and Render image. That gives a square with different lightning and shades that you see.

The image your created can be saved as a file
Explaining about the different views for the different tasks you perform: modelling, sculpting etc. But you can make different views by going from the right top and drag a new view, the same goes for the right lower corner:

To remove them: here is the fun –> wat was shown is not working for my setup. That is sow annoying. It states that you select the right bottom corner and drag it to the top. For me it creates a new view. So jumping to google again and shown in another Youtube movie. You should click on the top corner and if it changes in a cross you can drag it to the other view and a dark big arrow is shown that it puts those views together. If there are multiple sizes you have to make sure that the smaller ones first merge into the same size. In the example above, you cannot drag the left big view into the other smaller views on the right. So you have to close one of the smaller right views into a big one, after that you can close the left one by dragging it to the right.


The vlog creator does not have a name for the “gizmo”, but you can see the different XYZ axis. You can click on for example the Z. This gives you the view from above. It shows the place of the camera and the light, like this:

You can also click and hold the left mouse button and move. This way you can totally move the position to whatever you like. This moving is equal to hold your middle mouse button and move around with the mouse. So this is kind of better for those apple magic mouse users, that don’t have a 3-button mouse.
Zoom: scrolling the middle mouse button up or down.
 The same can be achieved by pres and holding the magnifying glass and move your mouse. Pretty handy!
Panning: so moving the view … hold SHIFT and middle mouse button and move mouse.
The same can be achieved by pressing the hand beneath the gizmo:

This was the moving part. Next part is about changing shape and color
This is done with the next menu items:

Moving is the 4 pointing arrows, rotating, scale. Those items are used ALWAYS.
Short key: moving is with G, comes from Grep. You can move freely around. If you want to move on the X/Y or Z axe, press those buttons and it will show in the text:

The Z axis was not visible, but it became visible after I clicked Z ! Now it only moves up or down. Sexy, right! Not so sexy are the steps between moving. So If you want to make the steps equal, press and hold CTRL. SHIFT makes smaller steps.
This is also done with the numbers. So the same moves as before: G and Z after that the cube was lifted 1.5 m, you can see that in the top left corner.

All the above apply also to the rotating trick. Instead of G, click R and the X. With CTRL pressed, it will rotate 5 degrees …
The last key combination is the S as in Scale. The CTRL key and numbers work the same. The only difference is that it works on all different axis at the same time. If you press the X axe, it will only scale on that axis. Numbers will do the same
Placing the camera
Showing that you can also do this in Render mode. You don’t have to use the menu: press 0 on the numpad key stroke. this will put you in camera mode. Press 0 again and you will go back to the previous view
Change colors
The basics for this moment, because you can do a lot more then these basic steps. Select the cube, go to Materials in the right lower part of the cube properties:

Base Color, change it by moving the mouse in the color ball, or if you have the numbers, enter those:

If you enter Render mode, you will see the nice color and shading will be more interesting with colors. The Rendering can be done through the menu or by pressing F12
One thing to notice is that after changing this, if you return in the object mode: no color is shown! What the … ?? This is because that is the default. You can change this by pressing the different Viewport shading options:

You can even render the objects, the next one after the Material Preview. The default plain object rendering mode, is only because of the power it needs. Imagine that your scene contains 1000 items all with their own coloring/shading etc. It will perform lousy.
Creating a house
We do this in Edit mode. Key for this is TAB key
Vertex: a point

Edge: a line between 2 vertexes

Face: 4 vertexes and edges is one face (for the cube!)

Now we need to move our object. So this is done in Object mode, so lets give it a TAB
We have to go to the front view and this is done by pressing 1 on the numerical pad. That is one I don’t have on my Mac keyboard, sow that is why I made a screenshot with the alternative route:
So let’s Grep the cube, we want to move it up! Otherwise the house would be under water, or under the ground.
Hmm .. whats brings me to mind: isn’t that ideal for a fitness room? Hmm ….
So G and Z and CTRL and place the bottom on the red line!
well done 😉
Now we will return to the Edit mode (TAB) and the next move is to extrude. Make sure face select is turned on. The upper face will be extruded. So this part is stretched. This is done by pressing the E key and because the upper face is selected you automatically select the Z-axis. You can also go the other way and that will make a hollow cube.


What we want is to create a to story house. A little bit different as shown in the vlog.
So Extrude, CTRL and 2 m high:
After that repeat the steps with the new upper face. But now only 1 m.
Now its time to make a roof! A nice roof is created by selecting the upper face and Scale and because it will scale on all points, select X to make it a nice roof:

We want a slightly different house because we need some space:

Now we have to place windows and doors. That is done with CTRL + R = Loop cut
By moving around you can see where the cutting line is placed. With the mouse wheel scroll up there will be more lines placed, with down less:

So that are 6 in the front part. Now we add some horizontal ones to the scene. You can click and move the lines around. With right mouse button will be placed back in the centre!

The same is done with the lines for the doors and windows. And even a lower one is added later to enter the house!
Now we are going to create some windows and doors in this cube:

This is done by SHIFT and selecting with the mouse, the different window and door places. Extrude and with SHIFT a little in the house backwards. After that the stair thingy to the doors with E and SHIFT and a little forward.
Now selecting the roof faces is a bit different. Because my house has been build differently as the example. But if you left click and hold the command key or windows key and left click the opposite face, it will automatically select the faces between them!